It's been almost a year since my last post..... hmpfff, crap, didn't mean for that to happen.
It's been a busy year. My consulting business has been humming along quite well, kicking my ass at times in fact. My retail web site business, on the other hand, is basically a perfectly preserved mummy. You can still go to the store and buy something, and I'll ship it to you, but I've not seen any activity in a long time, and I have not kept my inventory up to date with the latest cool stuff. It is a little sad, I really wanted to be in the Maker Electronics game, but resale is so much work, for minuscule returns.
I missed the opportunity to blog on a few personal projects over the past year, but I have a few more in the pipeline.
It's still on my to-do list to become an "expert" in the D programming language. It's still one of the more intriguing programming languages out there. I have been doing some professional work in Go this year. Go is "eh, OK", I'll leave it at that, it's not bad, but it's not a particularly exciting language for language geeks. I still have some D language blog posts in draft. I still plan to publish them one day.
One of my side projects this year was to acquaint myself better with the Xamarin platform. Xamarin is a platform for writing cross platform applications, typically in C#. Originally targeting Android and iOS devices, support for other platforms is rapidly expanding.
I wrote a board/puzzle game in Xamarin. I have a Android and UWP (Universal Windows Platform) published now. I also have an iOS version, though I don't have an Apple developer account to publish it.
I might get into a little more details in future posts, but Xamarin was pretty fun to develop in, though C# has a special place in my heart, so I'm a little biased. Xamarin's is a rapidly developing platform, the company was acquired by Microsoft, and they seems to be bringing it into the fold of their .Net platform family.
About 95% of the app's code is common to all three platforms, One of the coolest parts of the game is that it supports head-to-head multiplayer across platforms on the same local network. Two android devices can also play head to head using "Android Nearby" which uses Wifi/Bluetooth, and even ultrasonic audio to communicate device-to-device without needing to be connected to an access point. There is also single player against different AI algorithms, and that was super-fun to code. The AI makes a pretty tough opponent too without cheating (it only has access to the same game information that a human player would).
The UWP version runs on Windows 10, but technically it runs on the Xbox One as well. I was not able to get the game approved in Microsoft's marketplace for Xbox games, they are more strict about some of the rules for what games should and shouldn't do such as using Xbox Live for networking, so I gave up trying for that.
At any rate, I think it's a fun game, even though my primary goal was to have a learning experience:
Check it out for Android:
https://play.google.com/store/apps/details?id=com.DigitialPopcorn.KnockBack
And for Windows 10, you can get it here:
https://www.microsoft.com/en-us/p/knockback/9n7dp3cfzxtp
(Or search for "KnockBack" in the Microsoft Store app.)
Last but not least, I have a new personal project in the works to make some radical modifications to the open source Numworks Graphing Calculator. Among other things, I will be upgrading the CPU to a much faster than the already respectable one that ships in the stock model. More to follow later.
--P
Wednesday, October 10, 2018
Tuesday, November 7, 2017
New Project - "Knock Back"
I've been working on a little side project to keep up with the latest technologies. Sometimes my consulting work (#1 - 10 in the top ten reason I don't blog as much anymore) keeps me working on somewhat less than "cutting edge" technologies. You gotta work on what people want to pay for, sometimes doesn't always align with the latest cool toys.
I've been wanting to sink my coding chops into Xamarin for a long time, and I had some opportunities in my consulting, but I couldn't exactly train up on my client's dime.
I started a couple months ago on a new game using Xamarin, since I wanted to focus on Xamarin, and not spend a lot of time on 3D content and rendering code design, I made a simple 2D board game. I also wanted to do some intern-device communications work, so I made it multiplayer. I will write about it a little in future posts. I had a slight workload lull recently for the first time in almost 3 years, so I decided to make a push to get it marginally playable.
I have and Android, iOS, and UWP ("Universal Windows Platform") version of the app, though the Android version has the most attention at the moment. Eventually I will release the UWP version for Windows 10 & XBox One, but for now I only have the Android version published.
It is still really rough around the edges at this point, but basic multiplayer using Android "Near By", as well as single player modes against AI are fully playable.
Check it out:
https://play.google.com/store/apps/details?id=com.DigitialPopcorn.KnockBack&rdid=com.DigitialPopcorn.KnockBack
--P
Thursday, May 18, 2017
Don't call it a comeback.
Sacrebleu, Batman!
It's now been over a year since the last post on your favorite blog!
I really enjoyed my meager little blog, and I intend to see if the engine still turns over, and start posting again soon.
My consulting business has kept me beyond busy over the past year, which is good for paying my mortgage, but not so good for my "discretionary activities". I'm really going to try harder to find a spare hour here and there to do some cool stuff and bring this site back to life!
-P
Monday, February 22, 2016
A Blast from the past with Sedition.
A few years ago, I published an Android game, mostly as a hobby. I actually fell into making the game, it was originally planned to be a demo for a talk I was considering giving at a conference. The plans few through, but I kept on tinkering with the game. It was also a good source of material for earlier posts on this blog.
The result was Sedition for Android.
About a about ago, I got the crazy idea to port the game to run inside a browser. I have done some work with the Google Web Toolkit in the past, and I've been very impressed with the way in which it can make developing a rich client side application feel like you're developing a traditional desktop application. GWT compiles Java language code into very efficient complied Javascript. With the advent of HTML 5's media support and WebGl, I had everything I needed to take the Android source and port it.
Originally, I called it "Sedition 4 Chrome", since I was planning to make it a Chrome packaged app and put it in the Chrome app market. I may still do that. Writing a Chrome app gives you access to more features that you can do with lowest common denominator general web apps.
It has numerous quirks, and the rendering especially is not quite right in several ways, but that actually matches the last released version of the Android version. I do plan to fix both eventually. Some of the rendering oddities, especially "sprite parallax" are much more noticeable on large screens than the small mobile screens the game used to run on.
I also have a few ideas for the general engine I developed while working on that game that might come in handy for some of my other projects.
It's a fun project to work on, and in part I wanted it to server a sort of a portfolio of what types of applications I can develop.
Play it yourself at
http://anibit.com/sedition/
--P
Friday, December 4, 2015
Learning Programming
To say that I'm a software development enthusiast is an understatement. I think about it literally all the time. I think about application architecture as I'm falling asleep in bed, I think about algorithms in the shower, I daydream about debugging techniques while driving down the road(ok, only at stoplights ;) ). I think about other programming tasks as I'm programming. That last one isn't always a good thing, and I try to keep it in check.
When you have the level of passion for something that I have, it can become easy to be biased, and blinded to some of the realities of it. I've spent most of my life with the perspective "programming is such a pleasure, everyone should do it". I still have vivid memories of the first time I saw source code at 11 years old, and the instantaneous explosive ignition of a flame within me to become all about it. I can still recite the 6 line program almost verbatim:
10 LET N = RND() * 10 +1
20 INPUT "enter a number from 1 to 10", G
30 IF G = N THEN GOTO 50
40 PRINT "WRONG!, GUESS AGAIN"
50 GOTO 20
60 PRINT "CORRECT!"
Or something like that, I didn't write it, I'm not sure who did, maybe it was my best friend, who showed it to me, maybe it was from a book, but I had a googly-eyes over it "I can make a machine make decisions!".
In the course of my life, I've sought to spread this joy to those close to me - my siblings when I was younger, my wife, my kids. I've been in a wishful denial about is that some people just aren't wired for the programming mindset. This is not a bad thing, the diversity of the human mind is what makes our species great. My wife has an engineering background, and has worked in the IT field, and had worked as a software developer, and took courses on expanding her software development knowledge. But by her own admission, "I'm just not that into it". She switched careers and now works in special needs education. She found her own passion.
Similarly, I've exposed my kids to various incarnations of educational outreach designed to ignite a similar spark within them. They've had orders of magnitude more opportunity to become involved with crafting algorithms that I did. They're all still younger than I was when I saw my first code. My kids (and wife) are incredibly smart, but the jury is still out on if they have the same little something that makes me crave coding.
There's been a push in recent years to get greater exposure to a wider range of youth to encourage an interest in software development, as part of the "STEM" movement. While this is a fantastic thing, I am starting to think that we should also recognize that software development, or evening engineering in general (Contrary to some, I believe that Software Engineering is a *real* field of engineering, that simply has not matured enough yet as a career field to have all of the kinks worked out) is not for everyone. For one thing, it is hard to do correctly. The goal of programming education should be to facilitate, make it a viable career path for those who have the desire, and to kindle a desire in those who may not have had the opportunity(though in these days that is a diminishing demographic). What we should not do, is to "sugar coat" the art and science of it, pretend that the sole barrier to a career in software engineering is a lack of an friendly introduction and adequate access to computer time. It takes a lot more than that.
This port was inspired by an article I ran across this week:
The gist is nicely summed up as:
"All the evidence shows that programming requires a high level of
aptitude that only a small percentage of the population possess. The
current fad for short learn-to-code courses is selling people a lie and
will do nothing to help the skills shortage for professional programmers"
I more or less agree with this assessment, but in addition to the aptitude, it requires the passion for it, and "mental the circuitry". The basic knowledge of writing or understanding a few lines of simple code is a low bar compared to becoming a master of the craft. I think the percentage of the general population that possess the aptitude needed to develop code is greater than the article implies, perhaps it is even a majority of the population. However when considered with the subset of the population that also has the motivation, passion, to develop into a master, I arrive at the same conclusion. "Aptitude" is a loaded term, and unfortunately, carries a connotation of exceptionalism. That is not the intent, it is a fact that with any particular skill, only a certain percentage of the population posses an aptitude for that skill, it does not make them elite, only wire for that skill. I have precisely 0 aptitude for playing musical instruments, that means almost nothing outside the context of discussions on musical ability.
The takeaway is an idea that I have has bouncing around in my head for a while. There is no shortage of "learn to code" and "everyone can be a programmer" education out there, but there is a dearth of resources for those who wish to "take things to the next level".. Once someone gets through the basics, where do they go from there? For the most part, they are on their own. There needs to be more "experts" coming forward to develop the intermediate and advanced levels of educational programs for aspiring Software Engineers.
--P
Sunday, September 13, 2015
Back soon....
I've had a rough summer, I have struggled a lot with the grief of losing my baby sister:
When I wasn't grieving, I was putting in a lot of hours on some consulting projects. Needless to say, a lot of my "fun" activities have kind of ground to a halt recently. I think an important part of healing is trying to get back into a normal routine. I am forever changed by this, and I've done a lot of thinking about what is important in life recently. Happiness is important, and sometime happiness comes from otherwise unimportant things. I will get back to semi-regular blogging soon.
--P
 |
| Amanda Wolfe, 1982-2015 |
--P
Thursday, June 25, 2015
Re-debugging my HVAC
A few weeks ago I posted about my air conditioning woes, that in the end were due to ants infiltrating my AC relay.
I went out of town for a few days recently, and returned home on a 95 degree day to find that my compressor was not running and my 2nd floor was a steamy 93 degrees! The thermostat indicated that it had been running for at least the past 36 hours straight.
I immediately examined the back of my compressor housing and found it covered with ants. Once I had the access panel that covered the relay off, I confirmed that the 3 week old relay was indeed no longer conducting 240V mains power, even though the solenoid in the relay was powered and engaged. Freakin ants!
I had to act fast, it was around 2 in the afternoon, and the parts store, which was at least 1/2 hours away, probably closer to an hour in rush hour, closed at 5. I wasn't about to give up on the part so easily. Uncharacteristically of me, I had thrown out the receipt for the relay, so I'd have to buy a new one. I wanted to see if I could get the existing realy working again. I got a can of compressed air, some isopropyl alcohol, q-tips and fine grit sandpaper. The contacts had a heavy coating of petrified caramelized ant biomass. I was able to remove 95% of it, and my multimeter confirmed reliable conduction through the relay.
With about an hour to spare, I got the relay back in, flipped the breaker, and the compressor purred back to life. I think proceeded to wage chemical warfare on the 6 legged minions wrecking my day and my wallet. I had assumed that the first time was a fluke, or possibly a build up of ant carcasses over time. The second incident made it clear it was all out war. Fool me twice, shame on me.
My second floor cooled about 1.5-2 degrees fahrenheit an hour (I think it did hit around 100F outside later in the day), so by the late evening it was finally quite comfortable again.
--P
I went out of town for a few days recently, and returned home on a 95 degree day to find that my compressor was not running and my 2nd floor was a steamy 93 degrees! The thermostat indicated that it had been running for at least the past 36 hours straight.
I immediately examined the back of my compressor housing and found it covered with ants. Once I had the access panel that covered the relay off, I confirmed that the 3 week old relay was indeed no longer conducting 240V mains power, even though the solenoid in the relay was powered and engaged. Freakin ants!
 |
| Apparently 3 week's worth of ant biomass @240 Volts |
I had to act fast, it was around 2 in the afternoon, and the parts store, which was at least 1/2 hours away, probably closer to an hour in rush hour, closed at 5. I wasn't about to give up on the part so easily. Uncharacteristically of me, I had thrown out the receipt for the relay, so I'd have to buy a new one. I wanted to see if I could get the existing realy working again. I got a can of compressed air, some isopropyl alcohol, q-tips and fine grit sandpaper. The contacts had a heavy coating of petrified caramelized ant biomass. I was able to remove 95% of it, and my multimeter confirmed reliable conduction through the relay.
With about an hour to spare, I got the relay back in, flipped the breaker, and the compressor purred back to life. I think proceeded to wage chemical warfare on the 6 legged minions wrecking my day and my wallet. I had assumed that the first time was a fluke, or possibly a build up of ant carcasses over time. The second incident made it clear it was all out war. Fool me twice, shame on me.
My second floor cooled about 1.5-2 degrees fahrenheit an hour (I think it did hit around 100F outside later in the day), so by the late evening it was finally quite comfortable again.
--P
Friday, June 5, 2015
Debugging my HVAC system
It's about that time of year in North Carolina where my Yankee Blood compels me to engage the modern marvel known as central air conditioning. High temperatures average in the mid 80's fahrenheit (~29C) , but can sometime go above 90F(32C). It's also the time of year that you tend to discover something has gone wrong with your air conditioning hardware. Nothing stresses me more, it's one of the more expensive maintenance items facing a homeowner.
Last weekend, while my son was using one of ourspace heaters Xbox I noticed that the air conditioner didn't seem like it was keeping up. Heart-pounding, I sprinted through the 2nd floor of the house checking the air vents. Sure enough, they all seemed barely cool. We have independent air conditioning units, one cools our first floor, and the other cools our second floor, and the room on our third floor that serves as Anibit's central office.
The "evaporator" and blower part of the AC unit lives in an unfinished, uncooled, part of our third floor. You can usually feel that the ductwork leading from it is cold when running. It was warn. Bad news. Time to let the wife in on it so she can join me in the journey on the potential repair-bill coping process.
I went outside to where the compressor unit lives, and noticed that it was silent. Neither the fan nor the compressor motor was running. The coolant lines where exposed were slightly cool (everything had been working 30 minutes prior). Hmmm. This unit was relatively new. We had it installed about 4 years ago. The prior uint had, once or twice had its starter-capacitor die. The capacitor is only needed to handle the large current draw when the compressor motor first turns on. Last time we had it replaced by a service technician, it ran us about $250. I searched online and found the model capacitor used in my unit. $26 with express shipping.
I'm a genius! I saved ~90% (even more probably, since prices on service have probably grown since the last time). So we sweated it out for a couple days. Luckily, the weather changed mostly in our favor, going slightly below average. It did rain a lot, so the open windows and fans were bringing in a nice sticky-humidity you only really know about if you live in The South.
The capacitor eventually came, and I set upon swapping it out. The old one did have some rust on it, but not excessively. I love electronics, as you are well aware if you read this blog. But I avoid wall mains power as much as possible, because I'm clumsy, and make a mistake or two every once in while. The AC unit runs off the 220V appliance line, so I'm even more paranoid. There was a lot of voltage testing, and ground checking. I wore gloves and goggles, and used plastic-handled tools.
Then came the moment of truth. I had my wife on the phone, inside "Ok, go ahead and set it to 'cool'".
"Ok, it's flashing 'cool', flashing 'cool', ok it turned on"
CLICK! The relay in the outdoor unit engaged.
Nothing.
"Sonofa, I was so sure that was it! Hmm, wait keep it on, let me take some more measurements."
The fan and compressor motors are controlled via a large relay. Measuring the voltage on the output side of the relay revealed that it was not conducting. "Ah, the relay is bad!'
Not wanting to wait for another part to ship, and having the luck of a little free time in my schedule, I tracked down a local supplier a half hour away for a new relay.
I installed the new relay, still with as much caution, but not quite as much pomp as the capacitor. I turned the unit on, and raced out to check the compressor(my wife wasn't around this time).
Success!
Mechanical relays are relatively simple devices, and this one wasn't very old. I wondered to myself about why it might have died, and why they don't use a solid state relay. Maybe the high current makes it unsuitable, maybe AC solid state relays are prohibitively expensive or complex.
I decided to take apart the old relay and take a gander. The root cause became obvious at once:

Do you see it?
How about a closer look at the contacts (click on the image for a larger view):
Encrusted at each contact was a mass of dead ants. I have heard that ants were attracted to electricity, especially fire ants. We have fire ants in our area, but I have never noticed them on my property. At the same time, we have ant's in our house 365 days a year. This winter was the first time in 10 years I went more than a week without finding an ant in my kitchen, but they were back in rotation by february. I'm not sure if these are fire ants. If so, they are a little smaller than I typically see them. I'm not a biologist, but it is possible that 220V might cause a drop in ant stature.
The ants were all clustered right at the contact. There were no ants elsewhere in the relay. One thing I'm not sure is if the ants collected there in one event, eg they picked that fateful day last weekend to throw an electrofest, or, if it was a build up of individual ants that happened to by passing by right when the relay kicked in crushing them. Either way, it's hard to muster up any sympathy for them.
--P
Last weekend, while my son was using one of our
The "evaporator" and blower part of the AC unit lives in an unfinished, uncooled, part of our third floor. You can usually feel that the ductwork leading from it is cold when running. It was warn. Bad news. Time to let the wife in on it so she can join me in the journey on the potential repair-bill coping process.
I went outside to where the compressor unit lives, and noticed that it was silent. Neither the fan nor the compressor motor was running. The coolant lines where exposed were slightly cool (everything had been working 30 minutes prior). Hmmm. This unit was relatively new. We had it installed about 4 years ago. The prior uint had, once or twice had its starter-capacitor die. The capacitor is only needed to handle the large current draw when the compressor motor first turns on. Last time we had it replaced by a service technician, it ran us about $250. I searched online and found the model capacitor used in my unit. $26 with express shipping.
I'm a genius! I saved ~90% (even more probably, since prices on service have probably grown since the last time). So we sweated it out for a couple days. Luckily, the weather changed mostly in our favor, going slightly below average. It did rain a lot, so the open windows and fans were bringing in a nice sticky-humidity you only really know about if you live in The South.
The capacitor eventually came, and I set upon swapping it out. The old one did have some rust on it, but not excessively. I love electronics, as you are well aware if you read this blog. But I avoid wall mains power as much as possible, because I'm clumsy, and make a mistake or two every once in while. The AC unit runs off the 220V appliance line, so I'm even more paranoid. There was a lot of voltage testing, and ground checking. I wore gloves and goggles, and used plastic-handled tools.
Then came the moment of truth. I had my wife on the phone, inside "Ok, go ahead and set it to 'cool'".
"Ok, it's flashing 'cool', flashing 'cool', ok it turned on"
CLICK! The relay in the outdoor unit engaged.
Nothing.
"Sonofa, I was so sure that was it! Hmm, wait keep it on, let me take some more measurements."
The fan and compressor motors are controlled via a large relay. Measuring the voltage on the output side of the relay revealed that it was not conducting. "Ah, the relay is bad!'
Not wanting to wait for another part to ship, and having the luck of a little free time in my schedule, I tracked down a local supplier a half hour away for a new relay.
I installed the new relay, still with as much caution, but not quite as much pomp as the capacitor. I turned the unit on, and raced out to check the compressor(my wife wasn't around this time).
Success!
Mechanical relays are relatively simple devices, and this one wasn't very old. I wondered to myself about why it might have died, and why they don't use a solid state relay. Maybe the high current makes it unsuitable, maybe AC solid state relays are prohibitively expensive or complex.
I decided to take apart the old relay and take a gander. The root cause became obvious at once:

Do you see it?
How about a closer look at the contacts (click on the image for a larger view):
 |
| Oh the antmanity! |
Encrusted at each contact was a mass of dead ants. I have heard that ants were attracted to electricity, especially fire ants. We have fire ants in our area, but I have never noticed them on my property. At the same time, we have ant's in our house 365 days a year. This winter was the first time in 10 years I went more than a week without finding an ant in my kitchen, but they were back in rotation by february. I'm not sure if these are fire ants. If so, they are a little smaller than I typically see them. I'm not a biologist, but it is possible that 220V might cause a drop in ant stature.
The ants were all clustered right at the contact. There were no ants elsewhere in the relay. One thing I'm not sure is if the ants collected there in one event, eg they picked that fateful day last weekend to throw an electrofest, or, if it was a build up of individual ants that happened to by passing by right when the relay kicked in crushing them. Either way, it's hard to muster up any sympathy for them.
--P
Monday, June 1, 2015
The D programming language, "dlang" ,part 2: Templates
In my last post, I gave a brief overview of my background and interest in exploring the D programming language from a background of a seasoned C# developer. (Also note that I feel all "curly bracket" family of languages developers would appreciate D, it's just that if C# is one of your personal favorite of the family, D may have even more for you to like.)..
Now for the good.
After enumerating so many points lacking in D, you may wonder why I'm so enamoured with it. The language itself has many features found in C#, and also many features C# lacks. In some case's D implementation of a feature is superior to D. Let's give a brief introduction to some of the really cool parts of D that have no counterpart, or aren't done as well, in C#.
Templates
C# has generics, but as I hope to explain in future posts, they're not nearly as powerful as what D can do. Anyone who does worked a lot with C++ templates and found C# generics lacking, would be pleasantly surprised with D. D brings back the power of C++ templates without all the awkward syntax and linking issues you have with C++. Templates are a concept in D somewhat orthogonal to the definition of a type or method. A template is just a parameterized piece of code. You can place class and method definition inside a template, then those classes and methods are templated.
public template ListTemplate(T)
{
public class List
{
void add(in T item)
{
//stuff
}
//etc
}
}
That illustrates the idea, but if all you really want is a old fashioned template class, D, being pragmatic, has a shortcut:
public class List(T)
{
void add(in T item)
{
}
}
In addition to classes and functions, you can declare variables and type aliases inside templates too.
You can have value template arguments as well, something that doesn't exist in C#.
public class SillyArray(int size)
{
int[size] _myArray;
}
Now, the size parameter is part of the type of declared variables. If you've never worked with template value parameters before, it might not seem obvious what you gain from them. Because it affects the type of the class, just like a type parameter would, you could do things like define a range type:
public class Range(int low, int high)
{
int _value;
this(int value)
{
assert(value >= low && value <= high);
_value = value;
}
}
Now you have a type where the legal range forms part of the type itself, and the compiler can distinguish the legality at compile time.
Let's define an alias, akin to C++'s typedef though more powerful, to reference the type:
alias liquidWater = Range!(32, 212);
Now later on we could define a variable,
auto myCup = new liquidWater(4); //error, out of range.
In this case, the compiler can determine that the assertion will fail, and so it flags it as a compiler error. This is another great point about the D compiler is that it will evaluate assertions at compile time when it has enough information! When it doesn't it will still evaluate it at run time.
C# does have a limited type constraint system for generic type parameters:
class foo<T> where T : IDisposable where T : new()
{
}
This lets you declare that what type is used to instantiate foo must implement IDisposable, and that it must have a parameterless constructor(this feature seems like an odd special case to place in the language, I always wondered why they stopped there).
In D, it gets waaaaaay cooler than that. Essentially any logic you can supply that can be determined entirely at compile time can be used as a type of value constraint.
Going back to our range type, lets say someone did something like this:
alias invertedRange = Range!(100, 0);
Notice how the "low" parameter was greater than the "high" parameter? As the designer of the Range class, you never intended that. How might you prevent someone from doing that in a way that it's caught at compile time?
You add an template constraint expression:
public class Range(int low, int high) if (low <= high)
{
int _value;
this(int value)
{
assert(value >= low && value <= high);
_value = value;
}
}
public class Range(int low, int high)
{
int _value;
this(int value)
{
assert(value >= low && value <= high);
_value = value;
}
}
Now you have a type where the legal range forms part of the type itself, and the compiler can distinguish the legality at compile time.
Let's define an alias, akin to C++'s typedef though more powerful, to reference the type:
alias liquidWater = Range!(32, 212);
Now later on we could define a variable,
auto myCup = new liquidWater(4); //error, out of range.
In this case, the compiler can determine that the assertion will fail, and so it flags it as a compiler error. This is another great point about the D compiler is that it will evaluate assertions at compile time when it has enough information! When it doesn't it will still evaluate it at run time.
Type constraints.
C# does have a limited type constraint system for generic type parameters:
class foo<T> where T : IDisposable where T : new()
{
}
This lets you declare that what type is used to instantiate foo must implement IDisposable, and that it must have a parameterless constructor(this feature seems like an odd special case to place in the language, I always wondered why they stopped there).
In D, it gets waaaaaay cooler than that. Essentially any logic you can supply that can be determined entirely at compile time can be used as a type of value constraint.
Going back to our range type, lets say someone did something like this:
alias invertedRange = Range!(100, 0);
Notice how the "low" parameter was greater than the "high" parameter? As the designer of the Range class, you never intended that. How might you prevent someone from doing that in a way that it's caught at compile time?
You add an template constraint expression:
public class Range(int low, int high) if (low <= high)
{
int _value;
this(int value)
{
assert(value >= low && value <= high);
_value = value;
}
}
Now the compiler will not allow the inverted range alias declaration. As long as the logic can all be determined at compile time, anything is possible as a constraint, even function calls!:
bool isLower(int a, int b)
{
return a < b;
}
public class Range(int low, int high) if (isLower(low,high))
{
int _value;
this(int value)
{
assert(value >= low && value <= high);
_value = value;
}
}
This syntax really gives you a rich language for expressing contracts between parts of code in ways that I have not seen in other languages. These are compile time contracts, validation is immediate, not through unit testing or function tests, but before you ever have executable code. Your intention as an API designer can be very explicit. That, is what make me smitten with the language.
I''ve barely scratched the surface of what you can do with D's generic programming system. If you want to know more, check out the very well written online book "Programming in D" by Ali Çehreli at http://ddili.org/ders/d.en/templates.html
I''ve barely scratched the surface of what you can do with D's generic programming system. If you want to know more, check out the very well written online book "Programming in D" by Ali Çehreli at http://ddili.org/ders/d.en/templates.html
Until next time,
--P
The D programming language, "dlang" - Part 1
I've started a new project recently, related to a product I want to develop. It's a software-only product, but it's electronics related. I thought it would be fun to chronicle the development and design progress.
I'm working on a tool that I don't think really exists yet, at least in the way I envision it. As usual, I'm going to be coy about specifics until I'm ready to announce it.
I've mentioned in the past that I'm a programming language geek. I still feel that C# is one of the overall best, most productive programming languages out there, and it continues to get better with each new edition of the language. Now that Microsoft has let Linux and OSX join the .Net family (even if they are still somewhat still the red headed step kids, which I feel will change in the not too distant future), I'm hopeful that developing desktop code on .Net will become a reality.
I have had it on my list forever to give the "D" programming language a go, and this project presented itself as a good opportunity to try it out. D is a non-main stream programing language that has been around since 2001. Despite it's fantastic design and feature set, it's adoption has been slow and steady.
To make a long story short, I had it as a goal to use D to develop my new software. I admit that a small part was driven by the desire for something new and shiney, but I have spent a decent amount of time researching that language. I think that D has some of the right set of features for large and medium sized application architectures. D has a bag of features at your disposal that very few languages have and have done right so that you can pragmatically "get stuff done". Scala is another contender in this area, though in my experience Scala veers a little too much into academic theory and a little shy on the pragmatism end of things (for example loop flow control keywords were omitted because the language designers felt they encouraged imperative programming style.). At the same time, Scala, being a language that targets the Java virtual machine, is encumbered with some of that platform's limitations.
In the end, I decided to stick with C#, but not without a heavy heart and solemn face. I still have D in my heart, and will take another shot at it in the near future, it just wasn't the right fit in this case. The primary reasons for ultimately goign back to C# were the Framework support, especially GUI support.
Note that I'm be no means a D language expert. I've never authored any sizeable application in it. I'm still learning it. I'm bound to make a mistake or two here, please call me out if you spot something!
Comparison to C#
Thursday, May 21, 2015
TIP: Chrome on Windows 8.1
There's a bug in Chrome on Windows 8.1 that I've hit a few times now, so I figured I'd write a cautionary tale. It's a minor bug, but highly irritating.

The symptom
Whenever you start Chrome, it opens the last set of tabs and URLs you had open, even if your settings are to open a specific set of pages.
 |
| Exhibit 1: This setting gets ignored when the bug has been triggered |
Nothing you do in Chrome can get it to come back.
The Trigger
Note that I call it "trigger" and not "cause" because I don't know what the actual cause of the problem is. I have reported this issue to the Chrome team (at least I think I did).
I noticed the issue after Chrome updated, triggered by viewing the "About Page" in Chrome. I thought the update itself introduced a bug, but I have had updates that didn't have an issue.
It turns out that on Windows 8.1 machines, you are not supposed to manually restart Chrome after it updates. Google acutally does mention this in thier help: https://support.google.com/chrome/answer/95414?hl=en
But, it's somewhat inconspicuous, and who checks the help for the about page?
 |
| A fine example of print |
This is how I think Google should redo the Windows 8 advice:

The work around
It is best to either reboot after updating Chrome, or make sure that Chrome has fully exited, and restart it. Chrome likes to sit in the background even if no browser windows are obviously open. Some applications that rely on Chrome can keep the Chrome process running, even if you use the "Exit" menu on the Chrome menu. Chrome Remote Desktop is one of those applications. Use task manager or Process Explorer to make sure Chrome has exited.
If you've already clicked the evil restart button and Chrome's giving you lip, to get Chrome honoring your wishes again, I have found the following workaround. There may be a better way to fix it, but this has worked for me. (Some have reported that removing and re-adding your Chrome Profile works, but my method seems slightly less heavy handed).
- Make sure Chome isn't running.
- Open an Explorer window to: <your home folder>\AppData\Local\Google\Chrome\User Data\Default\File System
- Delete everything, including subfolders, in that folder.
- Start Chrome, it will re-create the folders.
If you know of a more clever, light-handed way to get Chrome back to Earth, please, leave a comment!
--P
Monday, May 18, 2015
What's up with me these days.
I have so many moments where I think, "that would be a great blog post". The end result is what you see on Bytecruft, not so many posts. I really enjoy writing a blog, though somehow it always ends up close to last in priorities.
My business, Anibit Technology is doing OK. Not great, but not exactly where I had hoped. The hardware business is hard, really, really hard. Re-selling other's hardware is even harder. I love being part of the "Maker" movement, however marginal. I wanted to make it something that I could do full time by diving head-first into it, and supporting myself and family by doing something that I love. That's the ultimate American dream, right?
My plan was, and more of less is, still something like this:
1. Design and produce hardware with accompanying software that will help people who like to invent, or who want to lean to invent.
2. ???
3. Profit.
Alright, that's a little facetious, but not as far from the gist of it that my characterization doesn't make me a little self-conscious.
Friday, April 17, 2015
I SPI with my little eye...
If you're trying to work with SD cards on a microcontroller setup you designed yourself, there's a good chance you have to write the low-level SPI drivers.
This page: http://bikealive.nl/sd-v2-initialization.html
Was indispensable for me recently when trying to figure out why I could not read an SD card. It turned out that an on-board regulator for one of my parts was expecting 5 Volts, so when supplied with 3.3 Volts, it was supplying ~2.3 Volts to the SD card, and it was not operating reliably. Once I told the SD card to operate on 2.7-3.3V, it would stop responding.
I placed a serial print statement in my low-level "spi-send-byte" function that printed the byte transmitted and the byte received, and it let me follow along the initialization sequence outlined in the above link and see where things went screwy.
--P
Saturday, April 11, 2015
Taxes
I feel like a kid who waited until the last minute to do that book report for school, and realized he should have actually read the book.
US Income tax filings are due on April 15th for the prior year. My income for Anibit sales is not organized in a way the makes it easy to come up with a net taxable income, so I have to manually pour over all sales for last year to come up with the proper figures. The worst part of it is that while I have the cost basis (ie, the part of gross sales that were not profit) data, I don't have an easy way to collate it, so I'm going to have to wear out the numpad on my computer with a bunch of spreadsheets. All of this will actually amount to a very small amount for Uncle Sam. Anibit's sales last year were nothing to write home about (more on that in a future post). I just really need to avoid overpaying what I owe, which is what would happen if I don't comb through all the sales.
This could possible be avoided if my Anibit's software had a little more in the way of reporting tools, but I understand it's a very hard thing to do since you can't really make a blanket formula for how tax accounting should work.
Thursday, April 9, 2015
Prototyping with EMW3162 "IoT" devices.
I've picked up a bunch of EMW3162 devices recently. I don't yet have any up on Anibit, I'm trying to figure out how many I want to keep and and many I could part with.
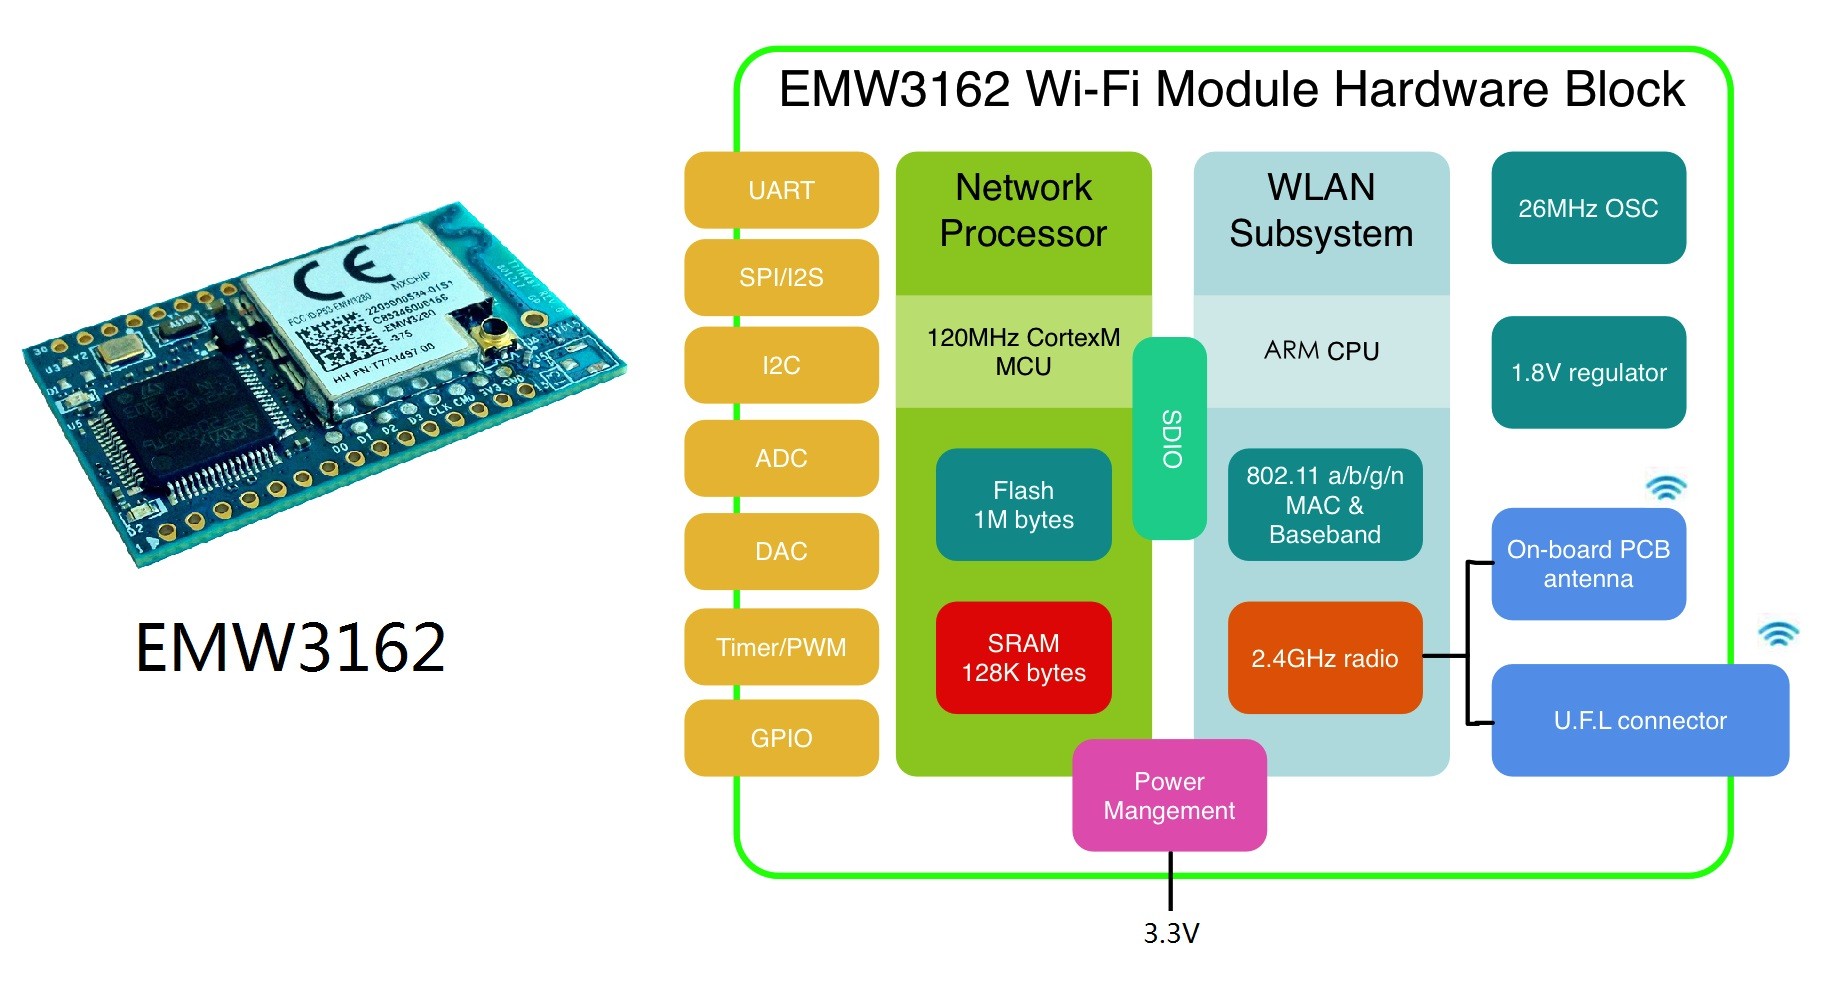
They are really neat little devices:
EMW3162 Overview
The Good
- Price: Runs in the neighborhood of $10 USD
- Wifi b/g/n, reportedly up to 54MBps
- On-board chip antenna, and UFL connector for an optional external antenna
- Included STM32F205 ARM Cortex-M3 120MHz CPU with 128kb SRAM and 1Mb of Flash
- About 20 available IO pins (+2 on board LEDs, and JTAG/SWD breakout)
- Uses Broadcom Wifi chipset, compatible (after some finagling) with their WICED sdk
- Broadcom has a lot of support for "IoT" in their SDK, with appliance samples, Access Point setup, and embedded web server support.
- Mostly (but not all!) 5V tolerant I/O pins. (I love that, level shifters are such a pain)
The Bad
- Documentation for the device itself, is almost non-existent.
- You must rely on the documentation for the constituent parts, and the work of some industrious hackers, see this.
- If you can read Chinese, you may have better luck.
- It's not straightforward on how to use it as simply a Wifi adapter for an external Microcontroller. I believe there are firmwares for this, but it will require a lot of research.
The Ugly
- 2.00 mm pitch headers on the breakout. Who does this, seriously! I think MxChip must have hired the person who came up with the XBee socket.
- The various SDK and libraries are a slight licensing minefield. If you want to use this for a closed source or proprietary application, read through all the licenses of all the sub-parts carefully. There are some "free for closed source commercial" library license options, but not all of them are.
Prototyping
I have thrown together a quick and dirty adapter PCB to let you mount the EMW3162 on a breadboard. I'm considering possibly doing a run of kits for the adapters to get the cost down, we'll see.
You can get your own adapter from OSH Park here. [Updated link to new version here] Use at your own risk, I have not received my boards yet to verify that it works, but a paper printout looked like it matched up, and the actual circuit is so simple. You will also need:
- 2 15-pin 2.54mm (0.1") pitch male headers for the breadboard part.
- 2 15-pin 2.00mm pitch male headers for the EMW3162 module, unless you already have them mounted.
- 2 15-pin 2.00 pitch female headers to receive the EMW3162 on the adapter.
Comparison to ESP8266
The main advantages of this over the popular with makers ESP8266 is that it has many more pins broken out, and they are 5V tolerant, making this device a better candidate for standing on it's own as an appliance vs acting as a peripheral for another Microcontroller. The CPU of the EMW is also faster (120 Mhz, vs 80Mhz), and has a lot more on board RAM and Flash space. Also, the WICED SDK from Broadcom is very sophisticated, with support for features such as OTA updates to the device. You can develop code to run directly on the ESP8266, but the support for that is more community built than officially supported. To be fair, WICED does not officially support the EMW3162, ether, but the board is close enough in design to other officially supported devices that it's not very hard to port.
Though the EMW3162 is about twice the price of the ESP8266, for some applications, it is worth it, especially if the extra capabilities allow you to remove external components form your design.
Resources to get you started
- Several folks have started an analysis as a Hackaday project, and they're adapting their own flavor of the WICED sdk for use with the board.
- The WICED SDK, which includes an Eclipse/CDT tailored to embedded devices using Broadcom chipsets.
- The Github Repo for the WICED fork specific to this board.
- Seeed studio sells a couple Development boards you can plug your 3162 into. This one has a JTAG port for an external JTAG, and this one has an on board JTAG built in.
- My breadboard adapter you can order in multiples of 3 for $8 per set (you'll need to find the headers separately)
--P
Wednesday, March 11, 2015
A ramble on web development from a non-millennial developer's perspective.
Having a background in desktop and embedded software development, web application development technologies frequently stymie me. I get "the good parts" of Javascript, but I often feel like Javascript makes what I've come to consider good practice in application architecture difficult. The loose typing of Javascript is an appeal to so many, but it can make it hard to maintain a very large code base.
Consider:
Javascript:
var foo = function (payload) {
var timestamp = payload.getTimestamp();
//some code that does something with timestamp, etc...
}
There is an inherent code interface requirement for anything passed into the function foo that it must have a member function named getTimestamp, and that function must return a type suitable for the expected operations.
There are essentially 4 ways in Javascript that a developer who wished to use function foo can discover this implicit requirement:
- Inspect the internals of the function foo, to learn all of it's expectations of the passed in type
- Read documentation bequeathed by the author(s) of foo
- run a "lint" -type tool for static analysis to catch improper usage.
- run the code and debug the exception that gets thrown when you pass it an invalid object.
All of these options, except maybe the lint option require manual human action. All of the options, including the lint option, are quite fallible. I did not include a 5th option that is unit testing, unit testing is a good thing, but it does not even begin to help this particular problem. For starters, the unit test will not replicate the real world usage. Where was the payload object created? It might come from a call back from within a callback from within a callback using an object stored form some earlier callback. Similarly, lint tools are a good thing, but they are far from perfect as well, and more cumbersome to use than a compiler.
compare the Javascript with the equivalent C#
interface IPayload
{
DateTime getTimestamp();
}
void Foo(IPayload payload)
{
var timestamp = payload.getTimestamp();
//do some stuff with timestamp
}
Now this example is trite, but the point is that as the size of your application grows, and you pull in more and more 3rd party code, the occurrence of problems surrounding the "hidden contracts" in dynamic languages like Javascript grow. In the C# version (or just about any statically typed, compiled language), you know immediately, and so does the compiler, what is expected of the payload object passed to Foo, it's contract is clear, and rigid.
There is a lot of thing appealing about how Javascript works and dynamic languages. Due to the nature of web the web, deployment has always been more of a challenge than with desktop applications. The ability to swap out a single file has it's appeal. Java server side tried to alleviate this with the servlet system and WAR files. It's also more terse, and superficially more forgiving. (Any object could be a "payload" in the Javascript version so long as it has access to the getTimestamp prototype.
Also, there is this appeal in the perception that a change in a third party dependency won't break your application. I think the problem is with dynamic scripting languages is that your relationship to your dependencies becomes a "gentleman's agreement", and not an enforceable contract. Say in the next version of the foo library, the authors made to following changes to foo:
var foo = function (payload) {
var timestamp = payload.getTimestamp();
payload.resetTimeStamp();
//some code that does something with timestamp, etc...
}
Maybe this was documented, no big deal right? If your code was such that you could find everywhere that payloads were created, great. But what if it's not that easy? Again, this is trite, but illustrative of a general problem, use your imagination. To fix this problem could involve a lot of debugging, text searching, inspecting logs, etc. Then when you have to integrate your code into another department's application, you have to do it again.
In C# the compiler would immediately find all cases where the 3rd party library broke you.
Ok that was a rather winded way of saying "dynamic languages pose extra challenges for large applications". This is also true of Python. This isn't to say I don't like Javascript or Python, that can do many things that would be hard or even impossible in other languages. The asynchronous nature of Javascript lets you do a lot without multithreading and the evil, evil shared memory synchronization patterns you must use with it. At the same time, I miss the comfort of knowing my object is an apple, not not having to debug to figure out I was suddenly passed an orange.
One of the great things about Javascript is the ecosystem, and the shear massive amount of effort and work going into it. There are more Javascript libraries and frameworks and tools than one could ever learn in a lifetime. Javascript is ubiquitous,
The second aspect to Web Development that makes me marvel at it's popularity is way in which user interfaces are created, the DOM. Creating user interfaces in html is for the self-taught an execise in cooking "div soup". Go to any major modern website; Facebook, Twitter, CNN, and open the page in the dev tools in your browser off choice. Invariably, it's built with nested div upon div upon div's. The css is typically where the magic happens that makes those div actually look and behave like the site you're visiting. But it's a dark art to getting it right and authoring, that comes with experience, not necessarily the good kind. It takes years of learning the arcane quirks like "oh you need to wrap that in a div with float:left" or "oh Firefox need's explicit widths on those elements". Compared to most of the Desktop UI frameworks I've worked with, traditional web UI development feels .... irrational.
There is hope though, I think things are getting better. HTML 5 has enabled the tools needed to make vast improvements. A lot of HTML 5 is not implemented yet, and even more is still experimental or bleeding edge. Web Components offers a path to maybe one day doing away with the div soup and making a more satisfying meal. I have been experimenting with Google Polymer lately, and it's still very new, but has me excited that I might soon be able to build a browser app with markup that makes sense for a UI.
Though I never used Silverlight much, I've used it's big sibling, WPF, extensively. It had its warts for sure, but creating a UI was so much more intuitive than the div soups/css hacks of HTML we see today. It makes me sad that Silverlight, met an untimely end. I feel it's demise was more due to a shift to mobile devices and away from browser plugins, than its technical merits. There is a project that I ran across in my feeds recently, Fayde, which is a re-imagination of Silverlight in pure Javascript. I was able to get a basic UI rendering in minutes, despite never using it before. It is super-neat-o.
For those crufty programmers such as myself, with a slight allergy to new-fangled dynamic languages, there are a lot off tools to let you build Javascript applications in the language of your choice. Tools like Google Web Toolkit(Java), Emscripten(C/C++), Typescript, Dart, JSIL(C#/VB) all let you shield yourself a little bit from the idiosyncrasies of Javascript and the very loosely-typed nature of it. It used to be that "strongly typed" was generally considered a virtue in a programming language, it seems like the rise of browser based development has flipped the consensus. I predict it will come full circle once really large "SPA" web or nodejs application developers start feeling the pain of maintaining multi-million line, aged, legacy applications that were built on gentleman's agreements.
--P
[Note, I struggled to find the right title for this post, no offense to millennial engineers is meant by it. I think if you learned how to program before Google was a thing, you cut your teeth under a different set of common wisdoms than today. Some are now obsolete but others got lost to the noise of the new shiny. The merit of strong explicit contracts seems like one of those lost wisdoms these days. I'm always keeping up with the new shiny, while trying not to loose touch with my roots. Millenials are crazy-smart and talented. Now get off my lawn!]
Thursday, January 8, 2015
Stupid C# tricks - "clean room" code execution with multi-instance applications and remoting.
The Scenario:
Sometimes, libraries, native dlls, or environment in your Windows application's running process can interfere with each other. 'Pure' .Net managed code is much less prone to conflict due to .Net's fantastic versioning, type system, strong naming, and separation via application domains. In real world applications, you often need to interact with a lot on native code or APIs where you have no such protection. This blog post is about a simple way to keep native dependencies separate for different code within a single .Net desktop application.
Background:
I have some software I'm working on in C# that requires the use of an embedded web browser. I'm have a web application I'm working on that is HTML5 and Javascript heavy, and I'm writing a C# application that hosts the web app and interacts with it to do some "heavy lifting" things that are not possible inside a browser without plug-ins. All I'll say about it right now is that it's robotics based, I'm going to open-source it, and the web app part with be available to run from Anibit, but I'll also have the offline Windows application that will be easy-peasy to use and have some fancier features than the pure browser based version. It will generate code, and the the offline version will also compile and upload the result to your device.
The Problem:
I found that when I had the browser loaded, the GeckoFx library, that is a managed shim for Mozilla's "xulrunner" embedded Firefox, that when I spawned the compiler as a child-process, it would fail with a lot of cryptic errors. If I did not load the browser component, the spawned compiler worked fine. I'm pretty sure that some dll's or environment settings or something in the process's memory were not playing well between xulrunner and gcc. Rather than spend forever tracking down the exact problem, which I ultimately probably would have had to build my own xulrunner or gcc binaries to fix, (yuck), I came up with a nice work-around that gives me the best of both worlds.
The solution:
On start-up in my application, before I have done anything, I launch a second instance of the application with special command-line parameters. The parameters tell the second instance that it should run in a "remote execution server" mode, and I also pass the Windows process ID of the parent to the server/child. The child process periodically checks to see if the parent process is still running, and exits if not.
The child process starts a server for a ".Net remoting" object. .Net remoting is one of lesser-known/understood technologies of .Net, but it's fantastic if you're on a pure Microsoft technology stack. It makes remote procedure calls across applications or even machines super simple. Essentially, with some small configuration files, and a little bit of support code, you can create a class who's functions automatically get executed in the child process. The calls can be synchronous, and parameters and return values are magically handled by the CLR. (Note that Microsoft advises against using the 'legacy' remoting APIs, and instead recommends using "Windows Communication Foundation". I find for really simple situations, .Net remoting is a bit simpler to setup and use, and the remote interface is dynamically generated so there's no endpoint API to maintain.)
Rather than make a lot of diagrams or posting code to this blog, I just put a small demonstration C# project on Github, if this sounds like it could help you, feel free to use it for whatever you want. You can find it here.
--P
Tuesday, December 23, 2014
Project Box explorer
I've adapted my "Automated CAD design" system to go a few steps further and have it generate all the data and metadata needed for an interactive website that lets you explore a canned(for now) set of design permutations.
I've got a lot of polish to do on the html itself, but I finally got it to a minimally viable web app.
Check it out: https://anibit.com/box
I've got a lot of polish to do on the html itself, but I finally got it to a minimally viable web app.
Check it out: https://anibit.com/box
Friday, December 12, 2014
A blog post about a video about a blog post.
I attend monthly meetings at Triembed, a hobby electronics enthusiast group in Central North Carolina.
The group holds 2 hour meetings, and in the first hour, people are invited to present things they've worked on, If you're convenient to the Raleigh area, and can make it to NC State's campus on the second Monday evening of the month, you should check it out! It's a great group of people.
At last week's meeting, I gave a brief talk about my "Automated CAD design" post. Pete Soper, one of the founder's and organizers of the group, was kind enough to edit and post the video of my talk to Youtube. If you've read my post, I don't have much new information in the talk, but I do say "um" a lot. (I have a secret podcast I've been working on, and I probably would have published it by now if I could stop saying the u-word so much).
Anyways, thanks Pete!
--P
Sunday, December 7, 2014
Stupid Simple Website Metrics
I wrote a tool that I am open-sourcing to keep track of website server performance. It is very un-fancy. It tries to do one job and do it well: Log and display page load times. (Wait, is that two jobs?)

Over the past several months, I've spent way more time than I had anticipated stressing over, testing, and trying to fix the abdominal performance I had on anibit.com. I was using a low end hosting service intended for personal websites, which I had expected to on the slower side of things, but it got so bad that page loads could take up to 45 seconds. That was even at times when I was the only user other than the failed spam-bot log ins once a minute or so. I would have been satisfied with 6 second loads even though that is considered a generally poor user experience. Something had to give. Anibit was on a shared server with probably dozens (my host service doesn't reveal that I'm aware of how many websites share your host). Any of them could misbehave and bring the server to it's knees until the hosting service brought the hammer down on them, which it frequently needed to do.
Background
Subscribe to:
Posts (Atom)